
Best Instagram Reels Export Settings in 2026

Instagram compresses every Reel you upload, but the right export settings help preserve detail, smooth motion and readable text. This guide gives you a reliable starting point for Premiere Pro, DaVinci Resolve and CapCut.
Best Instagram Reels export settings
| Setting | Recommended value | Why |
|---|---|---|
| Resolution | 1080 × 1920 px | Standard full-screen vertical resolution |
| Aspect ratio | 9:16 | Fills the Reels viewer without borders |
| Container | MP4 | Widely compatible and efficient |
| Video codec | H.264 | Reliable compatibility with Instagram |
| Frame rate | 30 fps, or match a 60 fps source | Avoids unnecessary frame conversion |
| Video bitrate | 8–12 Mbps | A practical balance of detail and file size |
| Audio | AAC, 48 kHz, 256–320 kbps | Clear audio with broad compatibility |
| Color | SDR / Rec. 709 | Reduces unexpected brightness and color shifts |
Instagram officially accepts Reel aspect ratios between 1.91:1 and 9:16 and requires at least 720-pixel resolution and 30 frames per second. However, 1080 × 1920 is the safer choice for a sharp, full-screen result.
Should you export at 30 fps or 60 fps?
Use 30 fps for talking-head videos, tutorials, product clips and most everyday content. It produces a smaller file and usually survives Instagram compression well.
Use 60 fps when the original footage was recorded at 60 fps and contains fast movement, sports, gaming or smooth camera motion. Do not convert 30 fps footage to 60 fps during export—it cannot create real additional motion detail.
What bitrate should you use?
Instagram does not publish one universal export bitrate for every Reel. For 1080 × 1920 H.264 video, 8–12 Mbps is a sensible starting range. Detailed motion may benefit from the upper end of that range.
A much higher bitrate creates a larger upload but does not guarantee a better Reel because Instagram will encode the video again. A very low bitrate can introduce blockiness before Instagram even processes it.
MSL worked example: how large is a 30-second video?
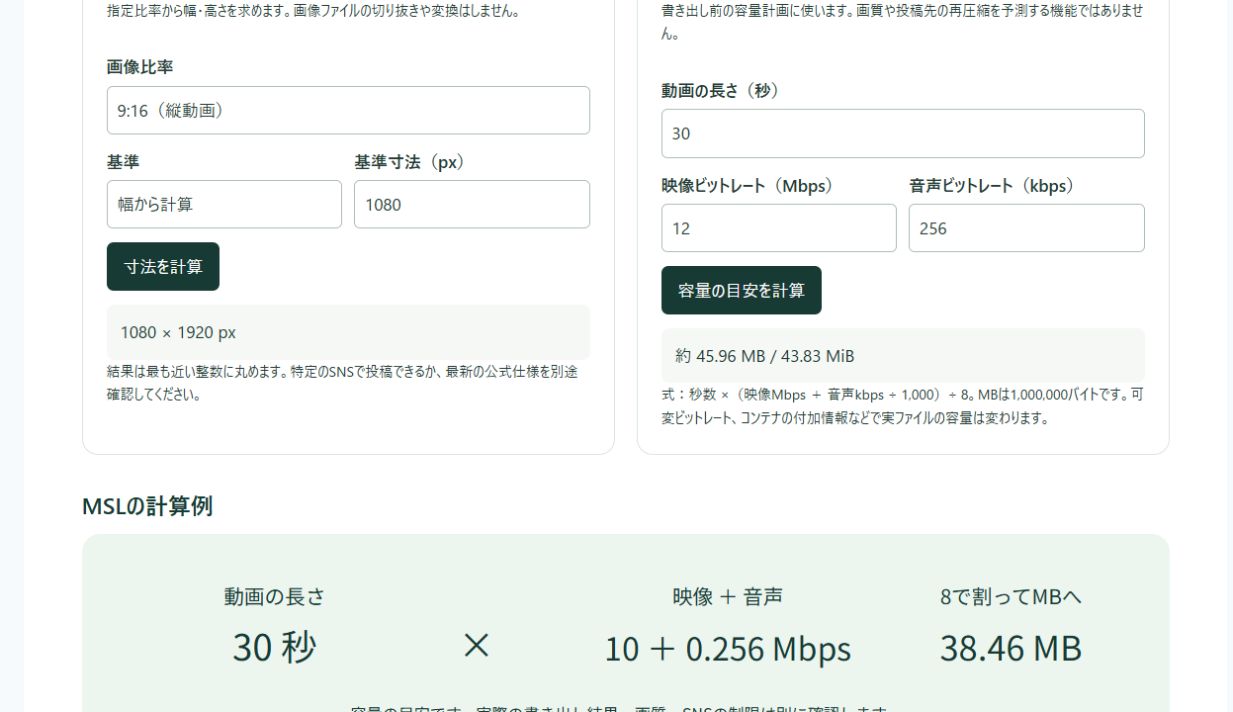
For a 30-second clip with audio fixed at 256 kbps, video at 8 Mbps gives approximately 30.96 MB; 10 Mbps gives 38.46 MB; 12 Mbps gives 45.96 MB. Resolution and frame rate alone do not determine the file size: duration and total bitrate matter.
Formula: 30 × (video Mbps + 0.256) ÷ 8. Divide by eight to convert bits to bytes; one MB is one million bytes.
On October 14, 2026, we entered 30 seconds, 10 Mbps and 256 kbps into the MSL public tools in a signed-out browser and observed 38.46 MB. Variable bitrate and MP4 overhead can change the actual file size. This checks the calculation, not Instagram’s recompression.
How I would check the export
- Select a representative 30-second section with subtitles and movement.
- Start the export at a proposed video bitrate of 10 Mbps.
- Compare the actual size with the estimate; play the file and inspect text, fine detail and audio sync.
- Check the published appearance too, and adjust future exports if needed.
This is an MSL workflow proposal. We did not run an export-app or Instagram posting test for this example.
Premiere Pro export settings
- Open Export and select
H.264as the format. - Set the frame size to
1080 × 1920. - Match the frame rate to the sequence: usually 30 or 60 fps.
- Choose
VBR, 1 Pass. - Set the target bitrate to approximately
10 Mbps. - Enable AAC audio at 48 kHz and 256 or 320 kbps.
- Export as an
.mp4file.
DaVinci Resolve export settings
- Open the Deliver page.
- Select
MP4as the format andH.264as the codec. - Set the resolution to
1080 × 1920 Vertical. - Use the same frame rate as the project timeline.
- Set quality to approximately
10,000 Kb/s. - Export audio as AAC at 48 kHz.
CapCut export settings
- Set the project ratio to
9:16. - Select
1080presolution. - Choose 30 fps, or 60 fps if the source and project use 60 fps.
- Select a high or recommended bitrate.
- Use MP4 and H.264 when the format options are available.
How to prepare a clean upload
- Start with a clean original instead of a previously downloaded social video.
- Avoid exporting and recompressing the same file multiple times.
- Use readable text with strong contrast and enough spacing.
- Keep important text and faces away from the screen edges.
- Upload using a stable connection.
- Enable Instagram’s highest-quality upload option in the app settings.
Reels safe-zone advice
Instagram places account information, captions and interaction buttons over the video. Keep faces, subtitles, logos and calls to action near the center of the frame. Avoid placing essential information at the extreme top, bottom or right side.
Interface positions can change between devices and app versions, so a generous central safe area is more dependable than relying on one exact pixel template.
Frequently asked questions
Is 1080 × 1920 the best size for Instagram Reels?
Yes. It provides a 9:16 full-screen vertical image and is the most practical export size for Instagram Reels.
Should I upload Reels in 4K?
4K can be useful as an editing source, but exporting at 1080 × 1920 is normally sufficient for delivery. Instagram will process and compress the uploaded video.
Is MP4 better than MOV for Reels?
Both can work, but MP4 with H.264 is usually the simpler option because it provides good quality, manageable file sizes and broad compatibility.
Why does my Reel look blurry after uploading?
Common causes include low-resolution source footage, an undersized bitrate, repeated compression, unstable uploading or Instagram still processing the high-quality version.
MSL decision example: a 30-second product tutorial
This is a worked calculation and a proposed comparison method, not a measured Instagram upload test. Assume a 1080 × 1920, 30 fps talking-head video with 256 kbps audio.
Estimated file size in decimal megabytes is total bitrate in Mbps × duration in seconds ÷ 8. At 8 Mbps video plus 0.256 Mbps audio, 30 seconds is about 31 MB. At 12 Mbps video, it is about 46 MB. These estimates exclude container overhead and variable-bitrate fluctuations. The extra 15 MB is an upload cost, not proof of improved playback quality.
- Export the 8 Mbps version and check subtitle edges, product labels and moving hands in the local file.
- If compression blocks are already visible, export a 12 Mbps comparison from the same project. Keep resolution, frame rate, color and graphics unchanged.
- Compare both files on the same device at the same brightness. If both are clean locally, investigate the upload and playback stages before changing bitrate again.
- When checking an uploaded Reel, record the device, connection and viewing time. Do not treat a processing preview as the final delivery.
Find the stage that introduced the problem
| Symptom | First check | Next action |
|---|---|---|
| Text is unreadable in the local file | Font size and contrast | Change the caption design before raising bitrate |
| Local motion looks blocky | Source footage versus exported file | If the source is clean, compare a higher-bitrate export |
| Only the uploaded version is blurry | Upload setting, processing and playback conditions | Recheck on the same device later and compare against the original |
| Buttons cover the captions | The in-app preview | Move captions inward and review the overlay again |
A 60 fps export does not guarantee that Instagram will deliver or play it at 60 fps. Export settings and the platform’s delivered rendition are separate things.
Related guides
Sources
- Instagram Help Center: Reel size and aspect ratios
- Meta Business Help Center: Safe zones for Reels and Stories
Last reviewed: August 2026. Platform specifications can change; verify critical delivery requirements with Instagram before publishing.
Observed calculator results: 8, 10 and 12 Mbps for a 30-second clip
On October 15, 2026, the automation assistant operated the MSL video-size calculator without signing in, keeping duration at 30 seconds and audio at 256 kbps. This checks the calculator, not an actual video export, visual quality or an Instagram upload.
| Video bitrate | Observed estimate | Difference from 10 Mbps |
|---|---|---|
| 8 Mbps | 30.96 MB / 29.53 MiB | −7.50 MB |
| 10 Mbps | 38.46 MB / 36.68 MiB | Baseline |
| 12 Mbps | 45.96 MB / 43.83 MiB | +7.50 MB |
The export worksheet contains calculated estimates and blank fields for actual file bytes, codec, frame rate, visual inspection and upload checks. Export your own clip at the three settings and record those results. Blank cells mean not yet tested.
Download the free exercise kit (ZIP) — 04-video-export-record.csv
My editorial decision
I would start comparisons in the 8–12 Mbps range and choose the smaller file if my own exports show no meaningful visual difference. This calculator trial does not establish equal quality at 8 Mbps. Variable bitrate and container overhead affect real size; actual exported files and viewing results determine the final choice.